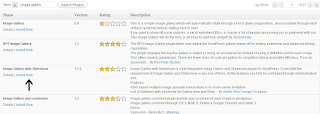
How to install wordpress plugin using WordPress Admin Panel Search Option

This way of Wordpress Plugin Installation Very Easy. The downside of this option is that a plugin must be in WordPress plugin directory. Free plugins that follow GPL and all WordPress guidelines are Under this directory.
Ads by AdGenta.com
For this you go to Worpress Admin Panel  and Click on Plugin > Add New
install wordpress plugin, installing wordpress plugins, how to install wordpress plugin, wordpress install plugin, install wordpress plugins, install plugin wordpress, wordpress search plugin

When you Install Wordpress Plugin will see the screen like the one in above screenshot. Now type Wordpress Plugin Name or Function, like we did. Then you will see a listing like the below.
install wordpress plugin, installing wordpress plugins, how to install wordpress plugin, wordpress install plugin, install wordpress plugins, install plugin wordpress, wordpress search plugin

Pick the Wordpress Plugin that is suite for your requirement. In our case we were searching for image Gallery Wordpress Plugin, then click the Install link. A popup the plugin information like the example below.
install wordpress plugin, installing wordpress plugins, how to install wordpress plugin, wordpress install plugin, install wordpress plugins, install plugin wordpress, wordpress search plugin

Now we see description, installation method, and related information about the Wordpress Plugin. If this is the Wordpress Plugin that you need, then click on the  Install Now button. When you click that button, the Wordpress Plugin will be installed, and you will screenshot like below.
Ads by AdGenta.com
install wordpress plugin, installing wordpress plugins, how to install wordpress plugin, wordpress install plugin, install wordpress plugins, install plugin wordpress, wordpress search plugin

After you click on Activate the Wordpress Plugin, you have installed the WordPress Plugin. You would have to configure the settings to fit your needs. These settings will vary for Wordpress Plugin therefore we will not guide about this in this post.
Tags: , , , , , ,
Share:

Explaining the WordPress Site Structure


WordPress Files and Directory Structure


When you install wordpress on your hosting, a default wordpress theme automatically activated.Here now we learn (wordpress Beginner) basic about wordpress website. Below wordpress outline describe about wordpress diffrent area.

wordpress structure, wordpress beginner, wordpress tutorial for beginner
Default theme of wordpress.
  1. This is Header are of  wordpress and display title of  wordpress Website.
  2. This Navigation of your wordpress Website. Which contain all pages of your wordpress Website.
  3. When you make new wordpress Post . All Content of your  wordpress Post are display here.
  4. Your all wordpress Widgets are display here. Actually Known as wordpress Sidebar .
  5. At Last is wordpress Footer area where display wordpress Footer Content .
Ads by AdGenta.com
In wordpress Theme every wordpress has diffrent theme. If you install another wordpress theme then its above mentioned content may be differ.
Tags: , , ,
Share:

PHP Pagination


Pagination of pages in PHP is a topic famous topic. So here I not explain any new php codes for Php Pagination. I will explain how you can use pagination for data held within an array.
Normally you did only need to paginate your data that if you’ve got quite a lot of it in.With database systems of course pagination (Php Pagination) can be achieved relatively easily by specifying the offset parameters in an SQL query. But what if your data didn’t come from a database table and instead came from a flat file. So look at the following code which expalin exactly how it’s done Php Pagination.
// Data, normally from a flat file or some other source
$data = "Item 1|Item 2|Item 3|Item 4|Item 5|Item 6|Item 7|Item 8|Item 9|Item 10";
// Put our data into an array
$dataArray = explode('|', $data);
// Get the current page
$currentPage = trim($_REQUEST[page]);
// Pagination settings
$perPage = 3;
$numPages = ceil(count($dataArray) / $perPage);
if(!$currentPage || $currentPage > $numPages)
$currentPage = 0;
$start = $currentPage * $perPage;
$end = ($currentPage * $perPage) + $perPage;
// Extract ones we need
foreach($dataArray AS $key => $val)
{
if($key >= $start && $key < $end)
$pagedData[] = $dataArray[$key];
}

Created the $data array which contains a long line of items distribute up by the pipe '|' character. Realistically this would be real data just for this tutorial I'll keep it simple. Then, using the explode() function I've cut up the $data variable into array using '|' as the delimeter.
The line 8 in Php Pagination simply gets the current page number one is provided.
Lines 7 to 13 Php Pagination do the math calculations which make this array pagination work. Now set how many items we'd like to display per page into the variable, $perPage. In the example above I've set this to 3.
On line 8 we're working out how many pages there are going to be. This can be done by dividing the total number of items (by using the count() function) by the items per page value. Notice on this line that I'm also using the ceil() function. This basically rounds the number up (e.g. 5.134 becomes 6).
We then have a simply if statement on lines 9 and 10 of Php Pagination. It's basically saying that if no page number has been provided or if the provided page number is more than the number of pages, set it to 0. This stops people from trying to access pages which have no items.
On lines 14 and 15 of Php Pagination we're setting the $start and $end variable which you might recognize if you've done pagination using SQL queries before. The $start variable holds the lowest ID of the item which can be displayed on this page. The $end variable is maximum cap which the items ID can be to be displayed (actually, it's one above, but this depends on how you do your if statement on line 17 of Php Pagination).
Great, we're nearly there. Now, on line 15 of Php Pagination we start a foreach statement which loops through each of our data items. Inside this loop is a simple if statement to see if the id of the current data item is above (or equal to) the $start value and below the $end value. If it is then we place a copy of it into our $pagedData array.
Once the foreach loop has finished the $pagedData array now contains all of the data items which we should be displaying on the current page. All we have to do now is to loop through and display them. This has been shown in the following code snippet.
foreach($pagedData AS $item)
            echo $item . "<br>";

As displaying the data goes that's it. Now need to display the pagination links to let you navigate your way through the pages. Here's the code for Php Pagination.

if($currentPage > 0 && $currentPage < $numPages)
            echo '<a href="?page=%27%20.%20%28$currentPage%20-%201%29%20.%20%27">« Previous page</a><br>';

if($numPages > $currentPage && ($currentPage + 1) < $numPages)
            echo '<a href="?page=%27%20.%20%28$currentPage%20+%201%29%20.%20%27" class="right">Next page »</a><br>';

Above codes of Php Pagination contain two quite simple if statements. First is displaying the "previous page" link and the another is for displaying the "next page" link.
If first statement checking to see if the current page is more than 0 and if the current page is less than the total number of pages.
The second if statement is checking to see if the total number of pages is more than the current page number and if there are any more pages after the current page.
Atleast you have done Php Pagination.
Share:

Send Mail using Php


Now Todays we will lean “send mail using php”. It simple method to send email using php codes. There are some field require to process this php script. These are like as To, Subject, Message, From. You can also extend all other option its depend on your requiremet. This guide to beginner for “send mail using php”.

Send Mail using Php Step 1:

Create File with name sendmail.php and paste above codes in it.

<?php
$to = "toaddress@mailservername.com";
$subject = "Just a test mail";
$message = "Just training on php";
$from = "fromaddress@mailservername.com";

Now we define the parameters to,suject,message and header containing from and reply address. In script header is the area where user set the from address, reply to address, cc address, etc.

/* To send HTML mail, you can set the Content-type header. */

$headers1 = "MIME-Version: 1.0\r\n";
$headers1 .= "Content-type: text/html; charset=iso-8859-1\r\n";

/* additional headers */
$headers1 .= "To: ".$to."\r\n";
$headers1 .= "From: ".$from."\r\n";
$headers1 .= "Reply-To: ".$from."\r\n";
?>

Send Mail using Php Step 2:
 
Now send the mail through Php Api

<?php
mail($to, $subject, $message, $headers);
?>
 You have done Send Mail using Php !
Share:

Enable featured image wordpress


This Post Describe ‘How enable Featured image in Wordpress?For this your theme is updated with higher version of Wordpress. If you have not latest version of wordpres then Download the latest version.  If you not see ‘Featured Image’ In Wordpress Admin Panel at right-bottom side when you create new Post then you have need to enable this option.

To Enable “Feature Image” in Wordpress, you need to add the following codes to functions.php template file:

Example:

// Add support for Featured Images
if (function_exists('add_theme_support')) {
        add_theme_support('post-thumbnails');
        add_image_size('index-categories', 150, 150, true);
        add_image_size('page-single', 350, 350, true);
}

Above written code you see that can help to enable  “Featured Image” in Wordpress. Now you can go to Wordpress Admin Panel and click on “Screen Options”.  There is option with title “Featured Image”. Be Sure the box is checked of “Featured Image”

You have done!
Share:

How to Connect to Mysql Database


To access the database tables from mysql you need to make connection with database. To complete this task you can use mysql_connect() function.

To do this in php language through. Choose your favorite Editor (Note Pad, Dreamweaver etc) then create a php file called connect.php. Now Inside connect.php file you apply below written codes.

Example :

<?php
$con = mysql_connect("localhost","root","");
if (!$con)
  {
  die('Not Successful Connected to Database ' . mysql_error());
  }

// Here is your codes Like Display Information from Database or Edit information etc.

?>

Now you saw the codes where $con is a connection variable which hold the all connection information. In mysql_connection() a localhost is server name that show above script run on local server and next two places are username and password where root is default username of mysql and password is by default null. If condition check the if variable $con hold not hold right information about connection then display message “Not Successful Connected to Database”. Next part is where you write your own script codes for data manipulation.
Share: